JOYN
In Product Realization: Design and Making I designed a phone stand to convert smartphones into downward facing cameras for virtual instruction. This project was especially relevant because I took this course virtually due to the COVID-19 pandemic.
FINAL DESIGN

JOYN is a phone stand adjustable to most phone sizes and has two reversible configurations. Its purpose is to help connect people by allowing anyone to easily turn a mobile phone into a downward facing camera for virtual instruction.
DESIGN INSPIRATION
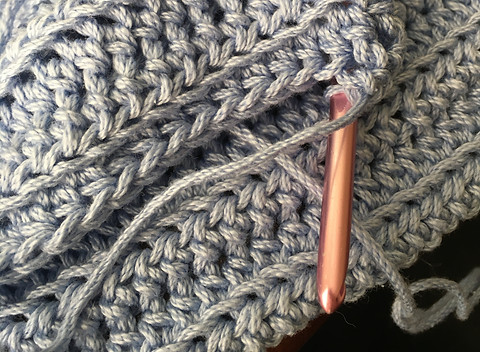
Everyone has been looking for creative ways to connect during the pandemic. The summer before I worked on this project, I taught my friends to crochet over Zoom. In order to show what I was doing with my hands, I called into the Zoom from my iPad and stacked it precariously on some books. When brainstorming project ideas for this course, I remembered my improvised iPad stand and wanted to improve on it. JOYN is a phone stand that clamps onto the edge of tables and desks to turn your phone into a downward facing camera for virtual instruction.
A focus for me with this project was finding a way to help connect people during the COVID-19 pandemic. When I was looking for a name I searched synonyms for connect and came across the word “join”. I chose it because it alludes to connecting people virtually, like joining a call, but with a simple swap of ‘y’ for ‘i’ the joy in this kind of connection is brought out. This is exactly what I hope my product achieves.
INITIAL DESIGN
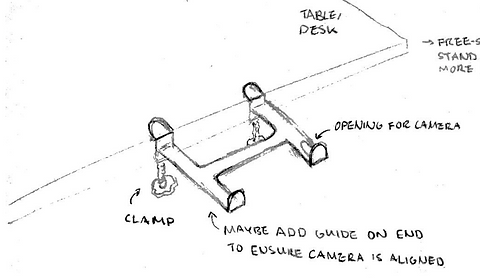
I initially designed an iPad stand that would clamp onto the edge of a desk. However, when I began to think about how this would be machined, I realized that the size of the stand would mean breaking the project into multiple pieces and then attaching them at the end, significantly increasing the complexity. I also saw that a phone stand would make the project more widely useful. However, many more models of phone are commonly used, so I wanted the stand to be adjustable to accommodate this.

.jpg)
.jpg)
RAPID PROTOTYPE
After revising my design to work with phones as opposed to tablets, I created a rapid prototype to test the mechanism I was envisioning. My design would be composed of two components: the plate, which would be attached to the clamp and support the phone, and the grabber, which would slide into the plate to grip the side of the phone. The two pieces would be connected with extension springs to give the grabber force. I used layers of cardboard to create slots in the plate for the grabber and rubber bands to mimic springs.
This prototype helped demonstrate that the adjustable mechanism would function as expected. It gave me confidence to model my design in CAD and brought up relevant questions about the dimensions and shape of components
INITIAL CAD MODEL
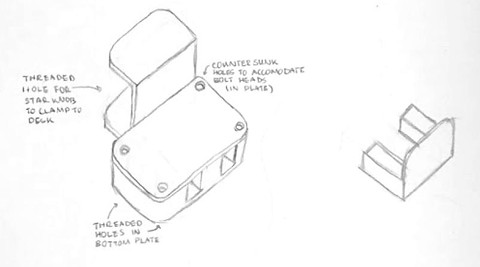
A piece of feedback that I received after creating my rapid prototype was that being able to adjust the height would be useful. To achieve this, I created a system of slots that a pair of shoulder screws on the phone-holding assembly would fit into. However, as I thought through the different use cases, I realized that what was more useful was the ability to switch the side of the clamp that the phone-holding assembly was on. Over the desk was better for demonstrating by writing things out, while having the assembly offset from the desk was better for demonstrating something like crochet, where you don’t need a surface to write on.

.jpg)
.jpg)
.jpg)
CAD REVISIONS
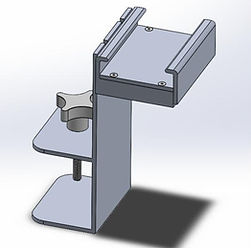
From this idea, I reversed the direction of the clamp to achieve the greatest possible height off the desk and simplified the slot system to a single pair of cuts all the way through, making the assembly reversible. This had the added benefit of simplifying the manufacturing of the components.
I also refined the design to begin incorporating purchased components and filleted geometry.
FINAL CAD
With the larger scale issues in my design settled, I started to focus on the more detailed considerations that I had previously put off.
The first was how to attach the springs in the internal mechanism. This was easily solved for the grabber. However, to make machining feasible for the plate side attachment I had to introduce an additional component attached via a machine screw.
I also added an end cap to the threaded stud on the knob to distribute the force more evenly and protect the desk surface.

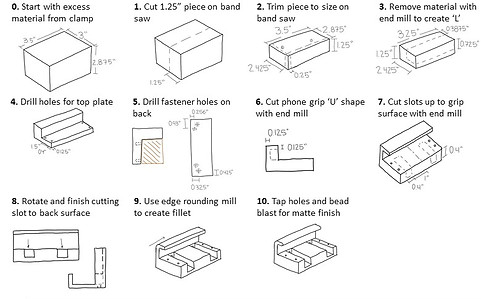
OPERATIONS SEQUENCE
RE-DESIGN FOR SCALED MANUFACTURING
As I transitioned from a single unit manufacturing plan to a scaled manufacturing plan I focused on simplifying my design as much as possible. For the plate, grabber, and end-cap pieces I selected die casting as the manufacturing process. Because of the relatively small wall thicknesses in these parts. The process of casting allowed for more complex geometry, through which I was able to combine the plate, top plate and spring attachment components of my single unit design into one piece. However, there were also trade-offs. I had to figure out how to incorporate draft angle into the pieces and additional channels to achieve uniform wall thickness. For the clamp I eventually decided on sheet metal forming, which proved to be an elegant solution that reduced material waste. Overall, I cut the total number of components by 50% from my original design, as well as learning some new tools in SolidWorks.
.jpg)
REFLECTIONS
Through this project I gained additional experience working with SolidWorks, including new tools such as sheet metal and rendering. I also accumulated a significant amount of knowledge on various manufacturing techniques and their relevant design considerations.
Lessons I took away from this project:
I want to thank the teaching team and all the PRL CAs for their time and advice on this project and the extraordinary effort they put into creating a meaningful class virtually during the COVID-19 pandemic. I would especially like to thank my coach, Kyle Denton, and the other members of my coaching group for their consistent feedback and encouragement throughout this project.
-
Creating more detailed sketches before starting CAD saves a lot of time, especially when considering how a part will be manufactured or interact with other parts
-
Relatively complex mechanisms can be effectively prototyped using basic materials
-
Creating an operations sequence for a part is useful to understanding manufacturing processes and how a part might be improved
-
Re-designing a part for different manufacturing processes can reveal simplifications to the design